Apex Legends has a large and varied map. The locations feel dense and feel a little more designed than those in other Battle Royale games. This makes it an intimidating experience for new players. Some players seem to know the best places to land, while others become a nervous wreck when they are selected to pick the landing spot. With this location guide, you’ll know where to land and which locations to prioritize.
As with any other aspect of a game like this, the locations are about balance. There is no silver bullet of a location, but there are places that give certain types of players an advantage over other types. You should pick starting locations that play to your strengths. With the help of this guide, you can find which area works for you and your team and head to it every time.
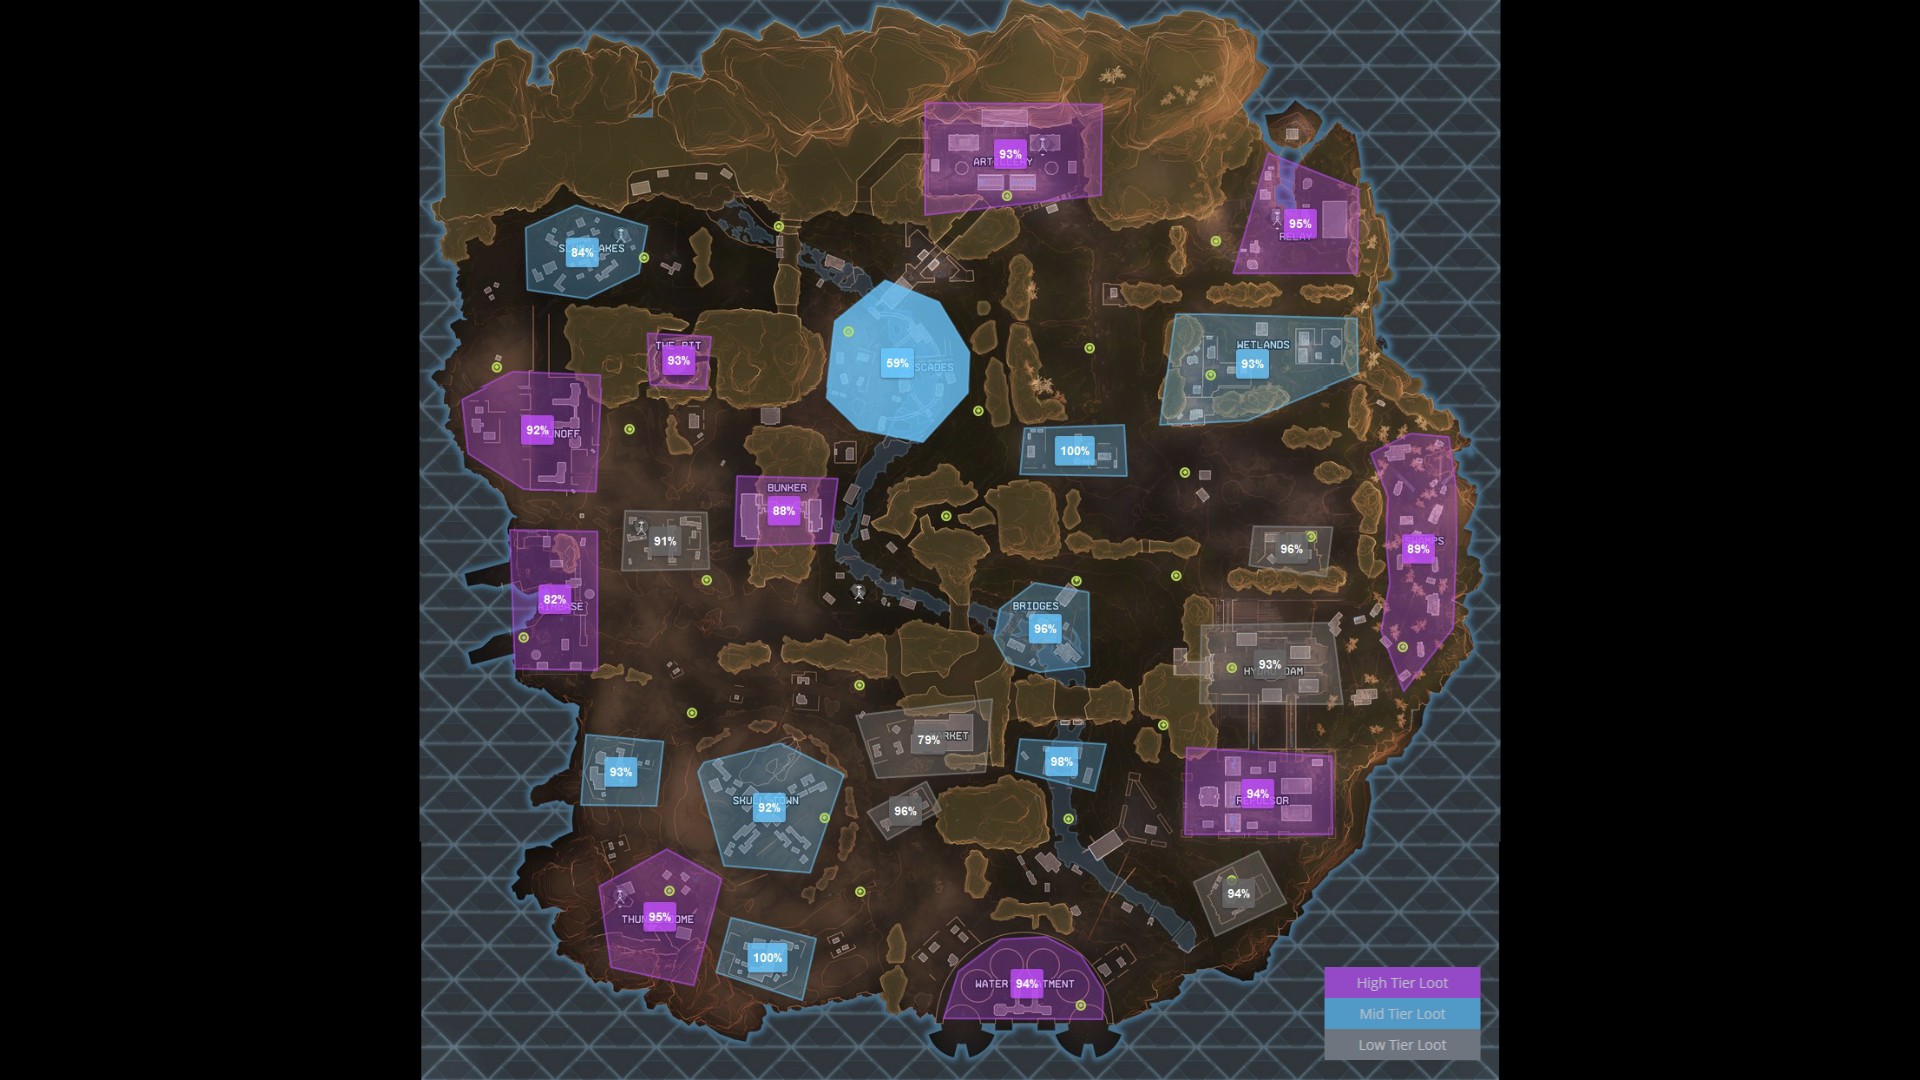
The folks over at ApexMaps.io have done a wonderful job creating a map that shows the best loot spots at a high level. Following that, we will go into more detail about various spots on the map.
Artillery
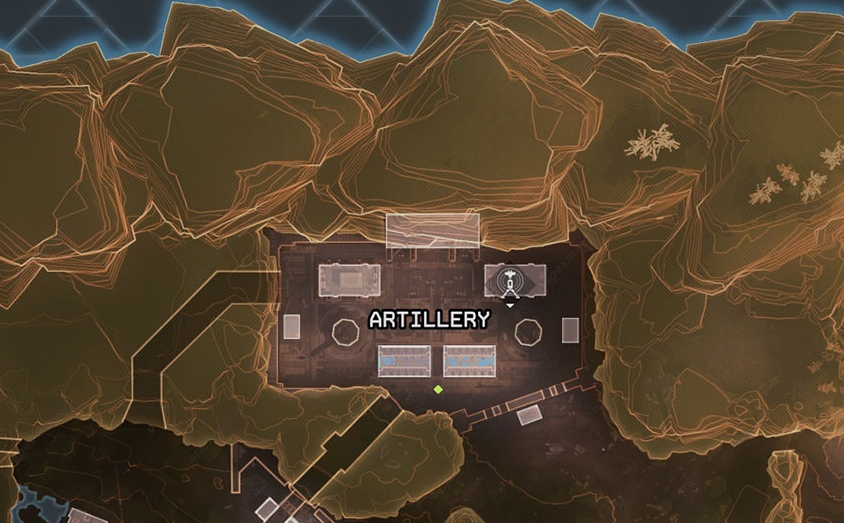
Artillery is the area located at the far north of King’s Canyon. Currently, it seems that this location more often than not contains high-level loot. You can’t be certain with these numbers because there is always a random element to it. However, some areas are statistically more inclined to contain higher-tier loot than others. King’s Artillery is one of these locations.
The area is a popular zone for dropping. Its high-tier loot tempts all sorts of plays. You need to ensure that you’re ready for a fight in the early stages of a game if you’re dropping into Artillery. It’s one of the most popular spots in this location guide. It’s not a drop zone for players looking to avoid action. However, if you want to load up on the best loot as quickly as possible or even just get some practice with fighting, then Artillery is a solid choice for a landing spot.
Relay
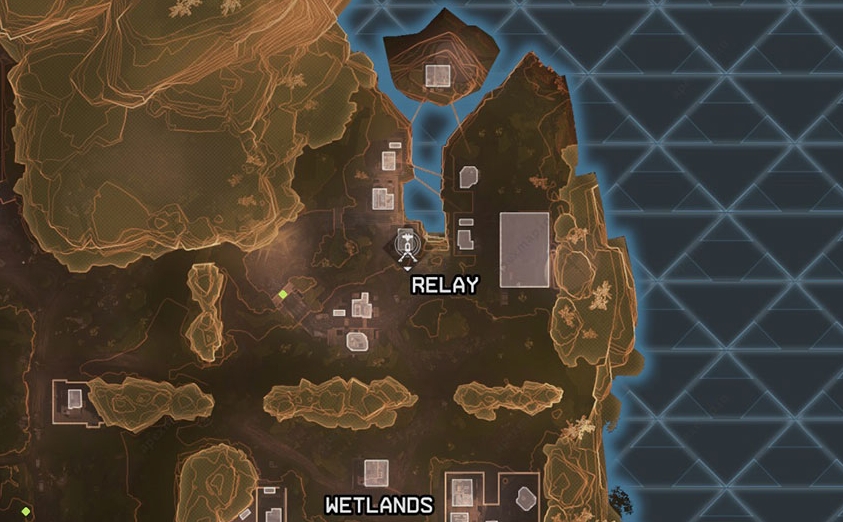
This area is in the top right corner of the map; this makes it kind of remote. As remote as an area can be with 60 players dropping into it. As with other Battle Royale games, the more remote areas will be less populated in the early stages of a game. There is a reason for this, they are the quickest to be covered by the ring that starts creeping across the map.
When you land at Relay, you don’t have to deal with as many other players as in other locations in this guide. However, in most games, you will have less time to loot before the ring catches up with you. This means you have to be confident in your savaging.
There is a small island just off of this area that can be reached with a zip line, this Easter-egg area often contains pretty high-level loot. If you have the capacity to reach this island every time, it’s worth heading over and taking the risk of the ring.
Relay is an area for players looking for a peaceful start. However, you need to be mobile once the ring starts to approach.
Skull Town
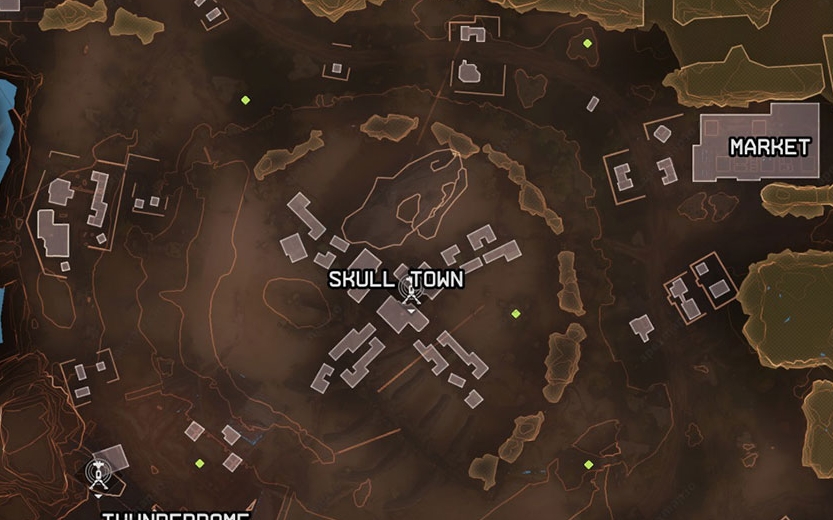
Skull Town is a large and dense area. While there is a lot to be gained from landing here, it is a central location which makes it a magnet for other teams. Skull Town is still worthwhile if you’re a skilled player and you know what you’re getting yourself in to.
Skull Town gives you great options for moving out to other areas. However, you will pay a price for this centrality. All of its loot is relatively compact, this makes it easier for your entire team to equip themselves at once. The trade-off is that you’re all sitting ducks for other teams in this area. Concentrating your entire, badly armed team in a small location is only for more confident players.
Skull town is a great alternative to the other central and popular areas, but it’s no ghost town. If you know how to properly defend yourself then you can really clear up in Skull Town. Alternatively, you could be walking into a bloodbath. If you land here, make sure that you’re prepared.
Repulsor
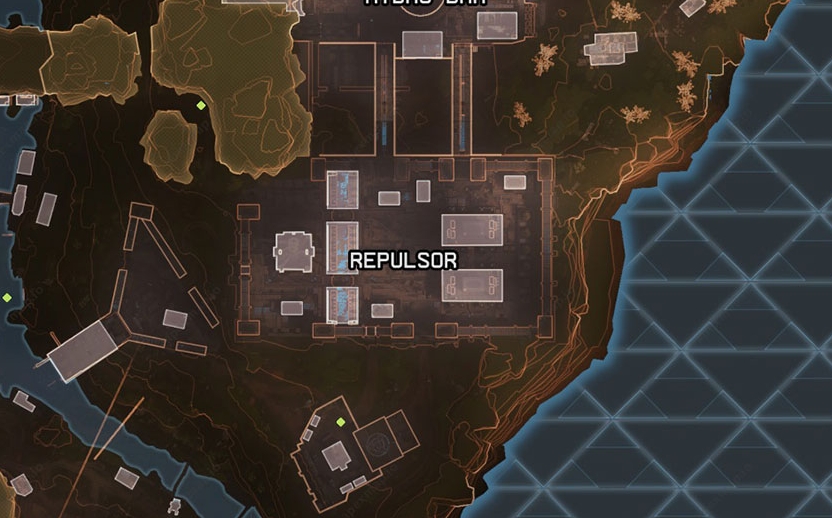
The loot available in Repulsor currently seems to be higher-tier items. This makes it one of the best places in this location guide to reliably get great equipment. It is similar to Artillery but is a more popular spot. As more players become aware of the chance of better loot in this location, it will become more popular.
Replusor also has more buildings than Artillery. This makes it denser and gives you different options for combat. If you’re confident in your close-combat abilities, then this will play to your strengths. Repulser can be a great place to keep your enemies locked down indoors.
This area is also connected by secret underground tunnels. Not all players have discovered this yet, so if you have to escape in a hurry that is a good option.
Slum Lakes
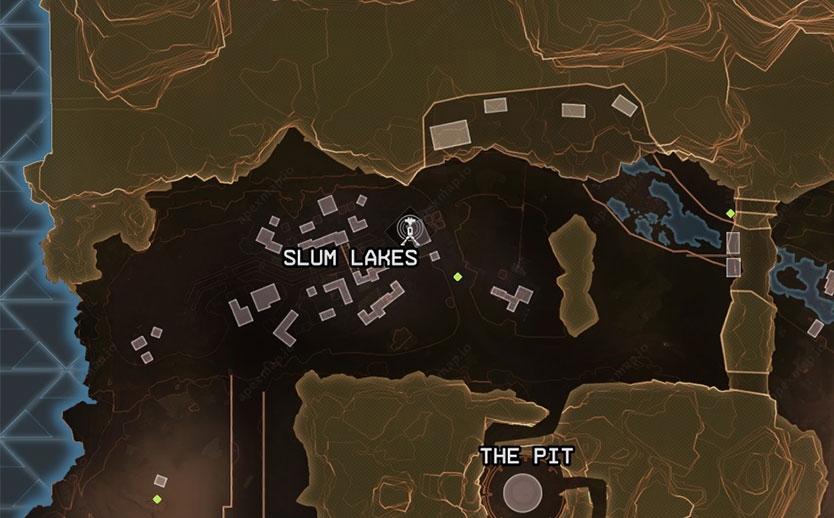
Slum Lakes is pretty much what the name says, a slum. It is a dense pack of houses. Each is crammed in together making it an enclosed and tight space. Much like tenants of a slum, any player who lands in Slum Lake will be crushed in alongside other teams.
The houses in these slums are easily defended. They are small and secure. Because of this, looting here can be done without the same level of vulnerability as more high-profile areas in this location guide.
Slum Lakes usually contains mid-tier loot. This does mean that educated players often won’t immediately head towards it. You can use this to your advantage by aiming for areas where new or uninformed players are likely to congregate. Slum Lakes could give you some easy eliminations on players still learning the ropes.
Bunker
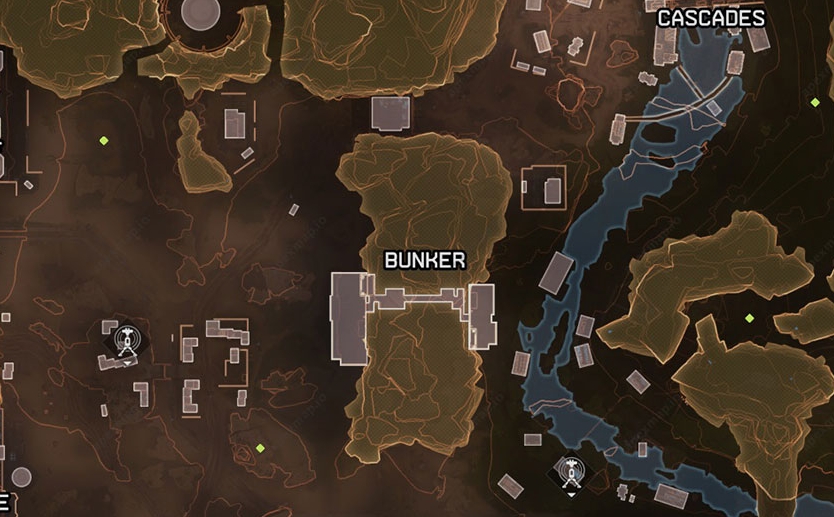
Bunker is a group of buildings and an underground complex that is one of the best places to consistently find high-level loot. As a trade-off, you’re pretty much completely exposed to enemies. This makes it a risky choice, but one that will pay off for skilled players.
A well-disciplined team may drop into Bunker, load up on high-tier loot, and then get out of there before other players have time to get equipment and find you. Blowing through Bunker quick enough to get everything before you’re made vulnerable takes some practice. If you’re willing to put the time into finding a pattern of looting that works for you, Bunker could be the spawn point that you head to every time.
Market
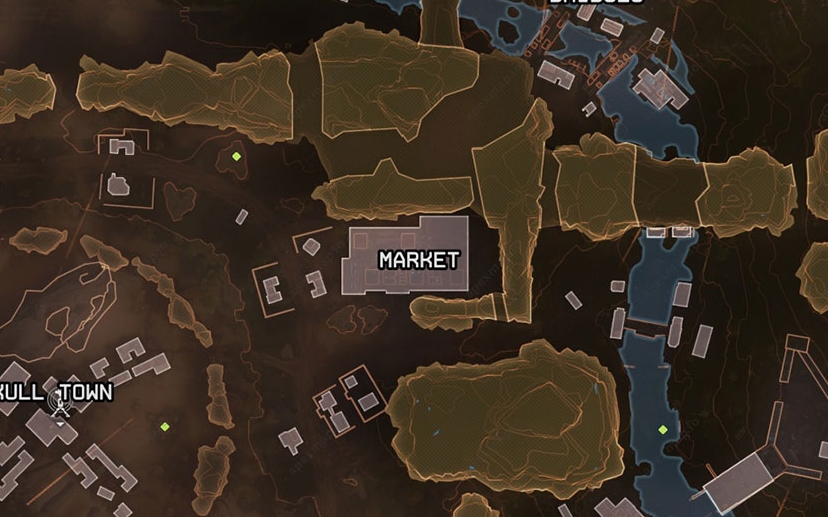
Market is the only place in this location guide with low-level loot. As with any game with RNG, you might still luck out and find some good equipment. However, most of the time you won’t. If you land in Market, you should be prepared to spend some time later in the game properly equipping yourself either from your eliminations or checking for supplies as you travel.
The buildings in Market are relatively big which means your entire team should be fully loaded by the time that you’re done. You’re trading quality for quantity but this can have major advantages. A squad of experienced players with all the equipment they need can easily take on someone equipped with only one item, even if it is of good quality. Getting more equipment sooner can put a skilled team in a better position than those with high-level loot.
Market is relatively enclosed, so your team will need to watch out for other players. The dense buildings can be a fortress or a death-trap, it all depends on how you play it.
Airbase
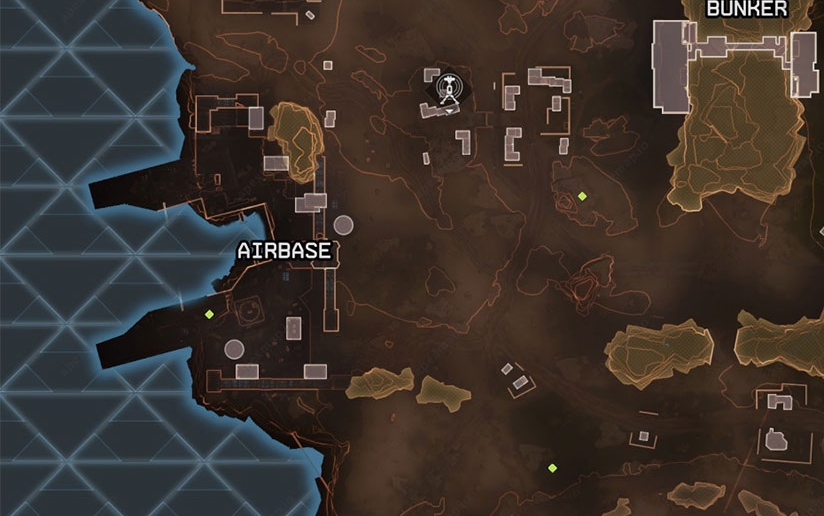
Statistically, Airbase a fantastic place to load up on high-tier loot. It is surrounded by a dam that keeps you safely insulation from the other areas on the map. It’s also in a relatively remote location, making Airbase a pretty quiet spot. This can make it a good place for players still learning how to survive for longer periods.
The loot here usually varies from mid to high tier. It can be a bit of gamble, more so than everywhere else in this location guide. Airbase might be relatively unassuming, but it makes it up for that with safety. You should have some preparations in mind in case the ring decides to float somewhere far away. Airbase isn’t the best position to be leaving from. Getting your loot sorted quickly is necessary if you want to leave in time.
These are the main areas in King’s Canyon that you have the choice between. Some areas offer high rewards if you’re brave enough to try them. Others offer safety in exchange for lesser equipment. With the help of this location guide, you should be able to find the places that work for you and then perfect your route through the map.
A good location is not much good if you’re not playing at your best. These guides will help you pick which Legend to play with, and which settings to use. Then you should be ready to start winning at Apex Legends.