Valorant is one of the most enjoyable competitive shooters to release in a long time. The game has a high skill ceiling, with a lot for players to manage. You’ve got to have your economy management mastered, know which weapons to use, and how to use each agent. On top of that though, having great map knowledge is important for putting all of that to good use. Icebox is the newest map to be added into Valorant and it has a lot to work with. There are the usual choke points and angles. Although, the unique aspects of the map like ziplines and jumping techniques really set it apart. Icebox gameplay is some of the most fun out there.
This Valorant Icebox guide covers what you need to know to perform well on this map. You’re going to need to strategize with your entire team. If a team can put great map knowledge to work here, then you can make a lot of progress on Icebox. This is what you need to know:
Valorant Ice Box Guide
Like most Valorant maps, Icebox is divided into two main sites. The A site, and the B site. While the middle and approach to these have a lot of crossover, the flow of a game is divided between A and B. Defending and attacking teams have limited options for accessing these two sites. The layout does give some routes between one site and another. The defender site has a decent enough passageway between the two. However, on the attacker side, a straight approach to A or B is the more straightforward way of going at things. Defenders should be looking to lock down the middle to keep it this way.
This guide is divided up between the attacking and defending sides for their different strategy. This is what you need to know:
Valorant Icebox Guide
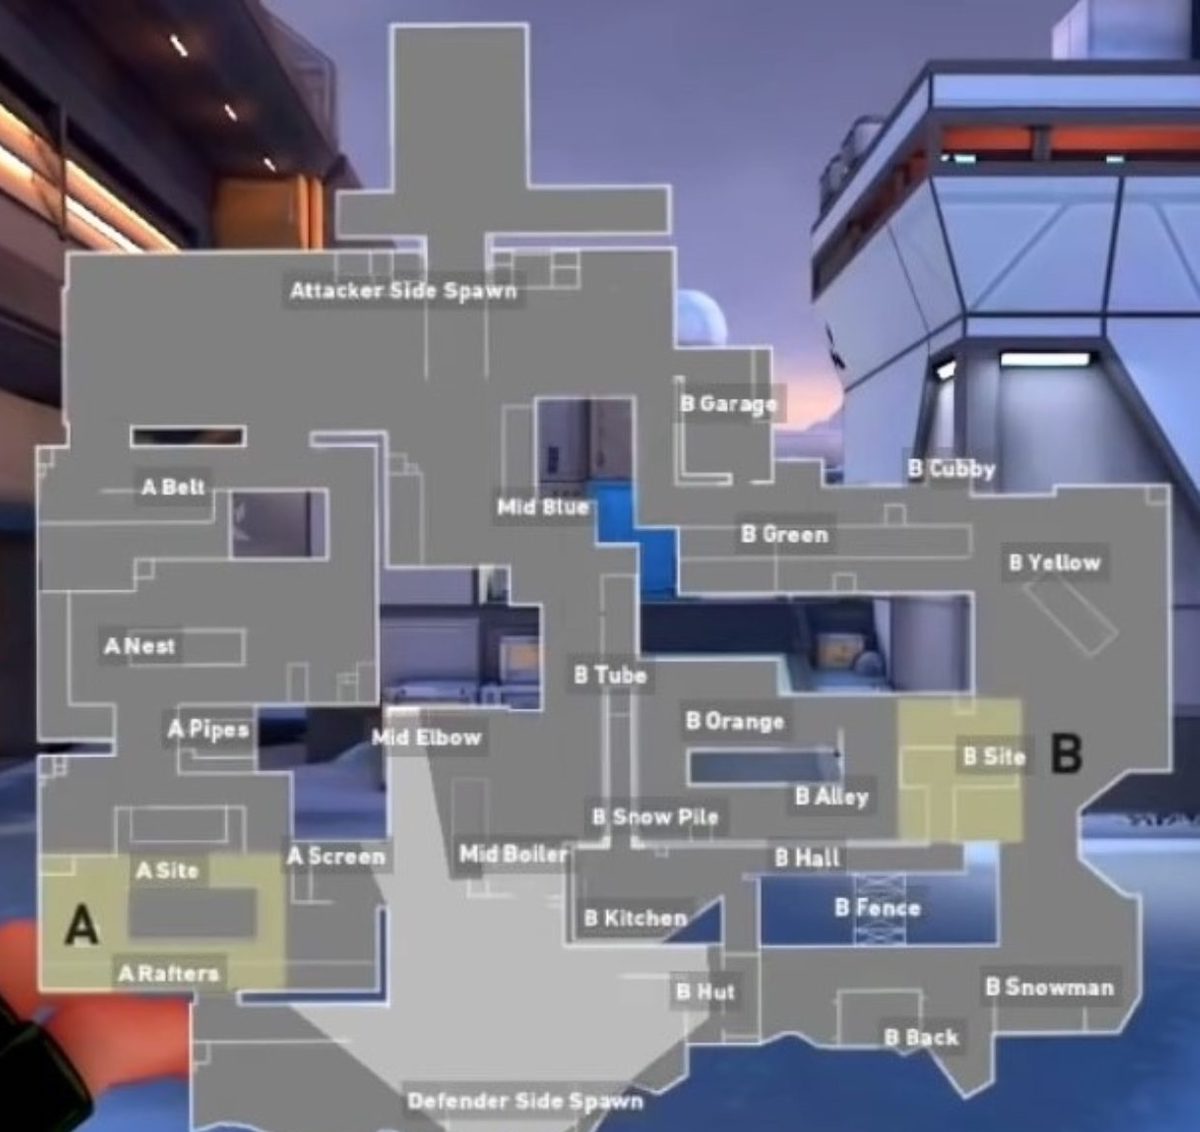
Defending Icebox
Defending Icebox can be split up into A, B, and Middle. The middle of the map is pretty openly orientated towards the B site. So defending B and defending Middle are really part of the same task. A good splitting up of players here is to have two players holding the A site, two in the middle, and one sentinel on B. Of course, this layout is just starting positioning. As enemies apply pressure, you’ll need to move players to accommodate. Keeping control of B should help you stay on top of enemy movement though.
Defending the B Site on Icebox
The B site has more access points that you’ll need to cover. The best way to split up is to have two players towards the middle and one holding down the main area, this can be adjusted when you know where enemies are coming from.
In the mid, keeping an operator around the Boiler gives them a good line of sight. This spot also has space to drop back. You will inevitably be smoked back from here. Dropping just further back lets you hold a better position without giving up much space.
Omen, Raze, and Jet all have great opportunities to use the verticality of defending the mid. Spots around the containers have good potential for taking the high ground. From here, you can push enemies back with smokes and relieve the pressure.
The main B site could do with a sentinel positioned there, since it’s pretty big. When defending, this larger open space needs to be mined for intel. The player here should be aware of where enemies are approaching from and their numbers. If under heavy attack, you can drop back from B. Compared to other maps, you care-take the B site here quite a bit easier. So holding on for information until the mid defenders come to back you up is a smart move. Having a B player back up to snowman is a good position to start push ahead again. Killjoy’s lockdown can work well here too. The B site is tricky but quite achievable to defend. As long as you can maneuver from mid to the site and fall back when necessary, you have a good chance.
Defending the A Site
The A site is indoors, which is kind of rare in the game. It is a lot more open than you’d think from that though. There aren’t too many choke points, and there’s a lot of options for playing verticality. Raze, Omen, and Jett work here again due to the more vertical nature of the positions you can hold.
Once you master that elevation, locking down at A can work better. There is a sniper nest in the middle with a zipline that leads to it. This can be useful in a 1-v-1. However, for the defending side this is a risky position to take. You should try and keep the nest clear of enemies, even if you can’t occupy it yourself.
You can tap the zipline to provoke a peak from enemies. Jumping off of it can be great for throwing smokes down then traveling across it to hop off just ahead of them. Controlling that high point is key, and you can use it flush out attackers or take control of their push.
Attacking on Icebox
Attacking the Middle
Holding the mid makes defending a lot easier, so how does that factor into attacking on Icebox? You need to go hard at the middle. There are loads of angles and lines of sight in the middle to B. So it shouldn’t be too difficult to use smokes to find openings in their defense. Omen is great for players here. You can cover off wider angles with his abilities. Smoking mid close to the tube can work before you get on top of the tube and gathering intel. With that intel, you should be able to push ahead.
Attacking Mid only really works for B when you get deep into it. The starting positions don’t give you much to work with so breaking through is key. Once you do, you can use mid to flank the A defenders or push in through ramp. However, you’ll usually use mid to work into B.
Attacking the B Site on Icebox
Going in from mid gives you the options of going through the tube into or smoking out deeper and pushing through oranges. The second is riskier but with decent abilities and numbers, it is achievable. That’s a play for a high-cost round though. Skye is going to work well in this approach.
B can work best do with teams splitting between the different entries. There are too many spots for defenders to use utility to keep you back. With that many openings, you can bait out their utilities and then overwhelm them.
The easiest way to push B is to take the middle and use it to approach B from a few different entry points. Few teams will have the utility to put a stop to this and you can effectively cut off quick reinforcements coming from A. The other option can work, but it is more difficult and more of a straight forward fight.
The A Site
The A side is a more straightforward one to attack on Ice box. This is really where the ziplines on the map come into play. The entrances near the attack respawn lead to high ground or lower. These are your two entrances.
You can jump down to attack straight forwardly, but you’ll need to use smoke to actually push in. This can be costly and often won’t give your team much of an advantage. There is a zipline to the sniper’s nest here but it pretty risky.
The best tactic on the A site on Icebox is to smoke out the sniper’s nest as soon as the round starts. Take the nest and the high ground with this. You can then smoke down and take unique angles to take the rest of A. You can cover teams coming through the low ground from this spot. While you’ll have to defend yourself in the nest, this makes attacking the A side a lot easier.
That’s all you need to know for some strategy on Icebox. With all of its verticality and the split, Icebox can be a fun and unique map to play. It gives some agents a lot of good chances to show off abilities in unique ways. To really perform well though, you’ll need to have mastered all of the core mechanics as well as the map itself. Our guides to those can help you improve there:
- How to Get Valorant Skins – Guide
- Valorant Killjoy Guide – Abilities, Tips and Tricks
- Who is the Best Valorant Team?
- How to Counter-Strafe in Valorant
- The Best Valorant Team Composition
- Ascent Map Guide